برتر فایل
مجموعه فایل های آموزش مقدماتی تا پیشرفته نرم افزار کتیا (CATIA) و مجموعه کتب, جزوات, پروژه و مقالات تخصصی مهندسی مکانیکبرتر فایل
مجموعه فایل های آموزش مقدماتی تا پیشرفته نرم افزار کتیا (CATIA) و مجموعه کتب, جزوات, پروژه و مقالات تخصصی مهندسی مکانیکآموزش اینونتور، آموزش مونتاژ سیستم تعلیق خودرو (Suspension) در نرم افزار Autodesk Inventor
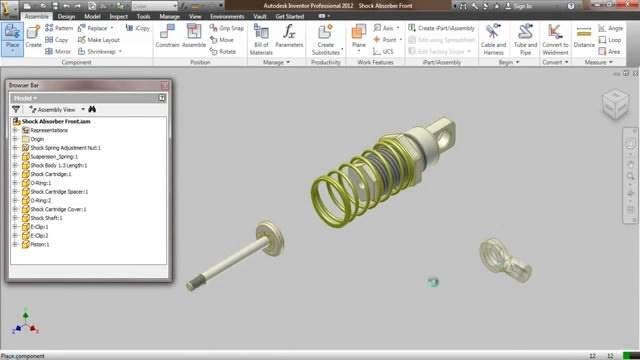
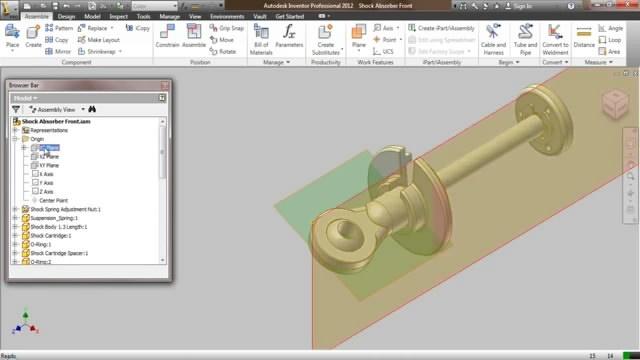
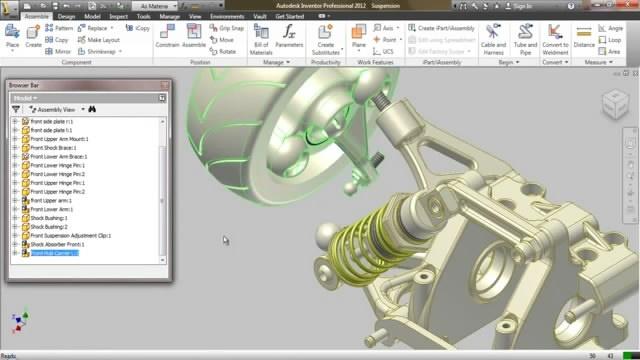
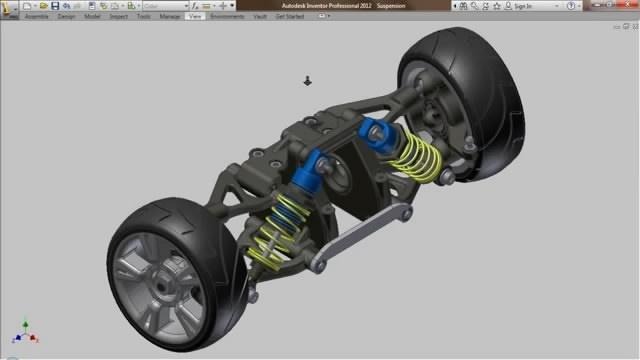
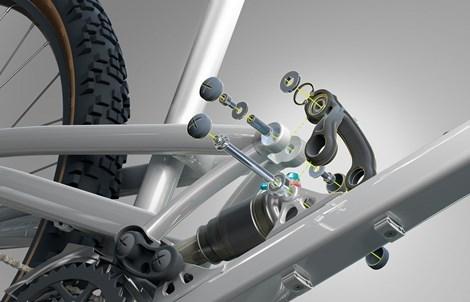
در این ویدئو آموزشی، نحوه مونتاژ سیستم تعلیق خودرو (Suspension) در نرم افزار Autodesk Inventor، به صورت گام به گام (75 دقیقه با کیفیت خوب)، به کاربر آموزش داده می شود.
توجه: فایل آموزش مونتاژ سیستم تعلیق خودرو بصورت کاملا تصویری، قدم به قدم و فاقد صدا می باشد. در این کلیپ آموزشی به گوشه ای از توانمندی های نرم افزار اینونتور پی خواهید برد.
آموزش اینونتور، آموزش مونتاژ سیستم تعلیق خودرو (Suspension) در نرم افزار Autodesk Inventor
آموزش اینونتور، کتاب آموزش مقدماتی تا پیشرفته نرم افزار Autodesk Inventor
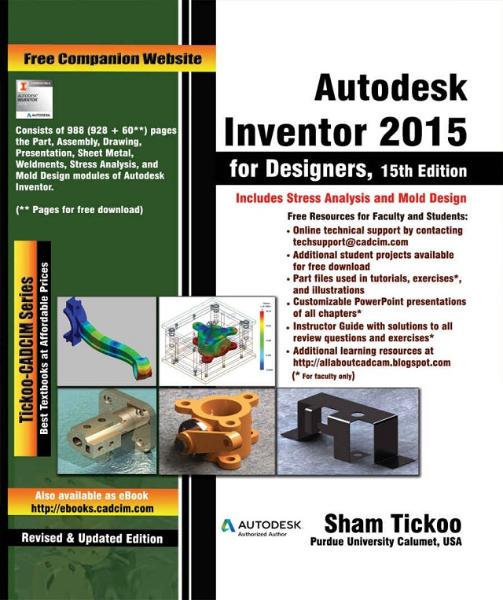
کتاب آموزش مقدماتی تا پیشرفته (مدلسازی، مونتاژ، ورقکاری، نقشه کشی، آنالیزو شبیه سازی، جوشکاری و طراحی قالب) نرم افزار Autodesk Inventor، یک کتاب آموزشی جامع و کم نظیر از آموزش نرم افزار اینونتور می باشد. الگوی آموزشی این کتاب مبتنی بر آموزش با مثال می باشد. همانطور که در فهرست مطالب کتاب که در قسمت پایین درج شده است، در این کتاب آموزشی، کاربر اینونتور با کلیه دستورات و همچنین نحوه طراحی و مدلسازی قطعات، مونتاژ مجموعه ها، طراحی ورقکاری، ایجاد نقشه های اجرایی و صنعتی، آنالیز و تجزیه و تحلیل قطعات، جوشکاری سازه ها و همچنین طراحی قالب در محیط اینونتور Autodesk Inventor آشنا می شود.
در ابتدای هر فصل دستورات مربوط به آن محیط توضیح داده شده است و در ادامه چندین تمرین کاربردی، به صورت گام به گام به کاربر آموزش داده می شود تا بر دستوراتی که در آن محیط فراگرفته اشراف کامل پیدا نماید. همچنین در انتهای هر فصل جهت تسلط بر موضوعاتی که کاربر فراگرفته، چندین تمرین در نظر گرفته شده است. این کتاب مشتمل بر 1196 صفحه، در 19 فصل، به زبان انگلیسی روان و به همراه تصاویر هر محیط و نوار ابزارها، به ترتیب زیر گردآوری شده است:
Chapter 1: Introduction
Chapter 2: Drawing Sketches for Solid Models
Chapter 3: Adding Constraints and Dimensions to Sketches
Chapter 4: Editing, Extruding, and Revolving the Sketches
Chapter 5: Other Sketching and Modeling Options
Chapter 6: Advanced Modeling Tools-I
Chapter 7: Editing Features and Adding Automatic Dimensions to Sketches
Chapter 8: Advanced Modeling Tools-II
Chapter 9: Assembly Modeling-I
Chapter 10: Assembly Modeling-II
Chapter 11: Working with Drawing Views-I
Chapter 12: Working with Drawing Views-II
Chapter 13: Presentation Module
Chapter 14: Working with Special Design Tools
Chapter 15: Working with Sheet Metal Components
Chapter 16: Introduction to Weldments
Chapter 17: Miscellaneous Tools
Chapter 18: Introduction to Stress Analysis
Chapter 19: Introduction to Plastic Mold Design
آموزش اینونتور، کتاب آموزش مقدماتی تا پیشرفته نرم افزار Autodesk Inventor
آموزش اینونتور، کتاب آموزش جامع (مدلسازی، مونتاژ، ورقکاری، نقشه کشی، شبیه سازی) نرم افزار Autodesk Inventor
کتاب آموزش جامع (مدلسازی، مونتاژ، ورقکاری، نقشه کشی، شبیه سازی) نرم افزار Autodesk Inventor، یک کتاب آموزشی جامع و کم نظیر از آموزش نرم افزار اینونتور می باشد. الگوی آموزشی این کتاب مبتنی بر آموزش با مثال می باشد. همانطور که در تصاویر زیر مشخص است، در این کتاب آموزشی، کاربر اینونتور با نحوه طراحی و مدلسازی، مونتاژ، ورقکاری، ایجاد نقشه اجرایی و شبیه سازی حرکت مطابق تصاویر زیر در محیط اینونتور Autodesk Inventor آشنا می شود. این کتاب مشتمل بر 165 صفحه، در 8 فصل، به زبان انگلیسی روان و به همراه تصاویر هر محیط و نوار ابزارها، به ترتیب زیر گردآوری شده است:
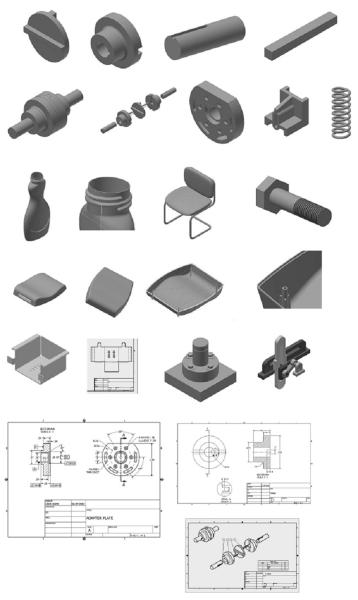
(تصویر بالا مجموعه تمریناتی است که به صورت گام به گام در این کتاب به کاربر در نرم افزار Autodesk Inventor آموزش داده می شود)
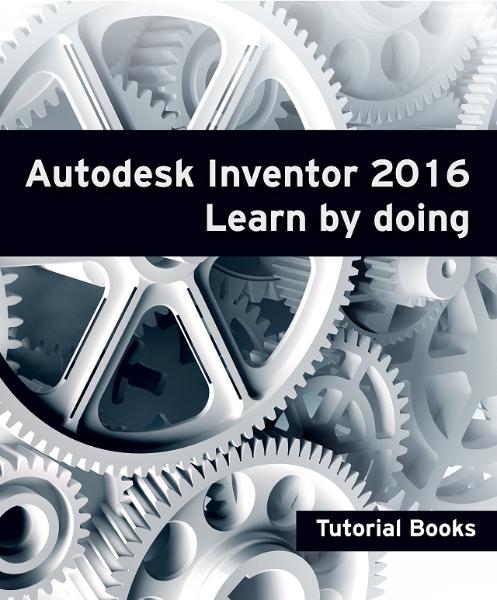
Autodesk Inventor 2016 Learn by doing
Table of Contents
Chapter 1: Getting Started with Inventor 2016
- Starting Autodesk Inventor
- User Interface
- Ribbon
- Application Menu
- Quick Access Toolbar
- Browser window
- Status bar
- Navigation Bar
- View Cube
- Shortcut Menus and Marking Menus
- Dialogs
- Customizing the Ribbon, Shortcut Keys, and Marking Menus
- Color Settings
Chapter 2: Part Modeling Basics
- TUTORIAL 1
- Creating a New Project
- Starting a New Part File
- Starting a Sketch
- Adding Dimensions
- Creating the Base Feature
- Adding an Extruded Feature
- Adding another Extruded Feature
- Saving the Part
- TUTORIAL 2
- Starting a New Part File
- Sketching a Revolve Profile
- Creating the Revolved Feature
- Creating the Cut feature
- Creating another Cut feature
- Adding a Fillet
- Saving the Part
- TUTORIAL 3
- Starting a New Part File
- Creating the Cylindrical Feature
- Creating Cut feature
- Saving the Part
- TUTORIAL 4
- Start Extruded feature
- Applying Draft
- Saving the Part
Chapter 3: Assembly Basics
- TUTORIAL 1
- Top-Down Approach
- Bottom-Up Approach
- Starting a New Assembly File
- Inserting the Base Component
- Adding the second component
- Applying Constraints
- Adding the Third Component
- Checking the Interference
- Saving the Assembly
- Starting the Main assembly
- Adding Disc to the Assembly
- Placing the Sub-assembly
- Adding Constraints
- Placing the second instance of the Sub-assembly
- Saving the Assembly
- TUTORIAL 2
- Starting a New Presentation File
- Creating the Exploded View
- Animating the Explosion
Chapter 4: Creating Drawings
- TUTORIAL 1
- Starting a New Drawing File
- Editing the Drawing Sheet
- Generating the Base View
- Generating the Section View
- Creating the Detailed View
- Creating Centermarks and Centerlines
- Retrieving Dimensions
- Adding additional dimensions
- Populating the Title Block
- Saving the Drawing
- TUTORIAL 2
- Creating New Sheet Format
- Creating a Custom Template
- Starting a Drawing using the Custom template
- Adding Dimensions
- TUTORIAL 3
- Creating a New Drawing File
- Generating Base View
- Generating the Exploded View
- Configuring the Parts list settings
- Creating the Parts list
- Creating Balloons
- Saving the Drawing
Chapter 5: Additional Modeling Tools
- TUTORIAL 1
- Creating the First Feature
- Adding the Second feature
- Creating a Counterbore Hole
- Creating a Threaded hole
- Creating a Circular Pattern
- Creating Chamfers
- TUTORIAL 2
- Creating the first feature
- Creating the Shell feature
- Creating the Third feature
- Creating a Cut Feature
- Creating the Rib Feature
- TUTORIAL 3
- Creating the Coil
- TUTORIAL 4
- Creating First Section and Rails
- Creating the second section
- Creating the Loft feature
- Creating the Extruded feature
- Creating the Emboss feature
- Mirroring the Emboss feature
- Creating Fillets
- Shelling the Model
- Adding Threads
- TUTORIAL 5
- Creating a 3D Sketch
- Creating the Sweep feature
- Creating the Along Curve pattern
- Editing the Freeform Shape
- Create another Freeform box
- TUTORIAL 6
- Start a new part file
- Creating the second feature
- Adding Threads
- Creating iParts
- TUTORIAL 7
- Creating the First Feature
- Creating the Extruded surface
- Replacing the top face of the model with the surface
- Creating a Face fillet
- Creating a Variable Radius fillet
- Shelling the Model
- Creating the Boss Features
- Creating the Lip feature
- Creating the Grill Feature
Chapter 6: Sheet Metal Modeling
- TUTORIAL 1
- Starting a New Sheet metal File
- Setting the Parameters of the Sheet Metal part
- Creating the Base Feature
- Creating the flange
- Creating the Contour Flange
- Creating the Corner Seam
- Creating a Sheet Metal Punch iFeature
- Creating a Punched feature
- Creating the Rectangular Pattern
- Creating the Bend Feature
- Applying a corner round
- Creating Countersink holes
- Creating Hem features
- Mirroring the Features
- Creating the Flat Pattern
- Creating 2D Drawing of the sheet metal part
Chapter 7: Top-Down Assembly and Motion Simulation
- TUTORIAL 1
- Creating a New Assembly File
- Creating a component in the Assembly
- Creating the Second Component of the Assembly
- Creating the third Component of the Assembly
- Adding Bolt Connections to the assembly
- Applying the constraint to the components
- TUTORIAL 2
- Creating the Slider Joint
- Creating the Rotational Joint
- Creating the Rigid Joint
- Driving the joints
Chapter 8: Dimensions and Annotations
- TUTORIAL 1
- Creating Centerlines and Centered Patterns
- Editing the Hatch Pattern
- Applying Dimensions
- Placing the Datum Feature
- Placing the Feature Control Frame
- Placing the Surface Texture Symbols
- Modifying the Title Block Information
- Additional Exercises
- Exercise 1
- Exercise 2
- Exercise 3
- Exercise 4
- Exercise 5
- Exercise 6
آموزش اینونتور، کتاب آموزش جامع (مدلسازی، مونتاژ، ورقکاری، نقشه کشی، شبیه سازی) نرم افزار Autodesk Inventor
آموزش اینونتور، کتاب آموزش جامع (مدلسازی، مونتاژ، ورقکاری، نقشه کشی، شبیه سازی) نرم افزار Autodesk Inventor
کتاب آموزش جامع (مدلسازی، مونتاژ، ورقکاری، نقشه کشی، شبیه سازی) نرم افزار Autodesk Inventor، یک کتاب آموزشی جامع و کم نظیر از آموزش نرم افزار اینونتور می باشد. الگوی آموزشی این کتاب مبتنی بر آموزش با مثال می باشد. همانطور که در تصاویر زیر مشخص است، در این کتاب آموزشی، کاربر اینونتور با نحوه طراحی و مدلسازی، مونتاژ، ورقکاری، ایجاد نقشه اجرایی و شبیه سازی حرکت مطابق تصاویر زیر در محیط اینونتور Autodesk Inventor آشنا می شود. این کتاب مشتمل بر 165 صفحه، در 8 فصل، به زبان انگلیسی روان و به همراه تصاویر هر محیط و نوار ابزارها، به ترتیب زیر گردآوری شده است:
(تصویر بالا مجموعه تمریناتی است که به صورت گام به گام در این کتاب به کاربر در نرم افزار Autodesk Inventor آموزش داده می شود)
Autodesk Inventor 2016 Learn by doing
Table of Contents
Chapter 1: Getting Started with Inventor 2016
- Starting Autodesk Inventor
- User Interface
- Ribbon
- Application Menu
- Quick Access Toolbar
- Browser window
- Status bar
- Navigation Bar
- View Cube
- Shortcut Menus and Marking Menus
- Dialogs
- Customizing the Ribbon, Shortcut Keys, and Marking Menus
- Color Settings
Chapter 2: Part Modeling Basics
- TUTORIAL 1
- Creating a New Project
- Starting a New Part File
- Starting a Sketch
- Adding Dimensions
- Creating the Base Feature
- Adding an Extruded Feature
- Adding another Extruded Feature
- Saving the Part
- TUTORIAL 2
- Starting a New Part File
- Sketching a Revolve Profile
- Creating the Revolved Feature
- Creating the Cut feature
- Creating another Cut feature
- Adding a Fillet
- Saving the Part
- TUTORIAL 3
- Starting a New Part File
- Creating the Cylindrical Feature
- Creating Cut feature
- Saving the Part
- TUTORIAL 4
- Start Extruded feature
- Applying Draft
- Saving the Part
Chapter 3: Assembly Basics
- TUTORIAL 1
- Top-Down Approach
- Bottom-Up Approach
- Starting a New Assembly File
- Inserting the Base Component
- Adding the second component
- Applying Constraints
- Adding the Third Component
- Checking the Interference
- Saving the Assembly
- Starting the Main assembly
- Adding Disc to the Assembly
- Placing the Sub-assembly
- Adding Constraints
- Placing the second instance of the Sub-assembly
- Saving the Assembly
- TUTORIAL 2
- Starting a New Presentation File
- Creating the Exploded View
- Animating the Explosion
Chapter 4: Creating Drawings
- TUTORIAL 1
- Starting a New Drawing File
- Editing the Drawing Sheet
- Generating the Base View
- Generating the Section View
- Creating the Detailed View
- Creating Centermarks and Centerlines
- Retrieving Dimensions
- Adding additional dimensions
- Populating the Title Block
- Saving the Drawing
- TUTORIAL 2
- Creating New Sheet Format
- Creating a Custom Template
- Starting a Drawing using the Custom template
- Adding Dimensions
- TUTORIAL 3
- Creating a New Drawing File
- Generating Base View
- Generating the Exploded View
- Configuring the Parts list settings
- Creating the Parts list
- Creating Balloons
- Saving the Drawing
Chapter 5: Additional Modeling Tools
- TUTORIAL 1
- Creating the First Feature
- Adding the Second feature
- Creating a Counterbore Hole
- Creating a Threaded hole
- Creating a Circular Pattern
- Creating Chamfers
- TUTORIAL 2
- Creating the first feature
- Creating the Shell feature
- Creating the Third feature
- Creating a Cut Feature
- Creating the Rib Feature
- TUTORIAL 3
- Creating the Coil
- TUTORIAL 4
- Creating First Section and Rails
- Creating the second section
- Creating the Loft feature
- Creating the Extruded feature
- Creating the Emboss feature
- Mirroring the Emboss feature
- Creating Fillets
- Shelling the Model
- Adding Threads
- TUTORIAL 5
- Creating a 3D Sketch
- Creating the Sweep feature
- Creating the Along Curve pattern
- Editing the Freeform Shape
- Create another Freeform box
- TUTORIAL 6
- Start a new part file
- Creating the second feature
- Adding Threads
- Creating iParts
- TUTORIAL 7
- Creating the First Feature
- Creating the Extruded surface
- Replacing the top face of the model with the surface
- Creating a Face fillet
- Creating a Variable Radius fillet
- Shelling the Model
- Creating the Boss Features
- Creating the Lip feature
- Creating the Grill Feature
Chapter 6: Sheet Metal Modeling
- TUTORIAL 1
- Starting a New Sheet metal File
- Setting the Parameters of the Sheet Metal part
- Creating the Base Feature
- Creating the flange
- Creating the Contour Flange
- Creating the Corner Seam
- Creating a Sheet Metal Punch iFeature
- Creating a Punched feature
- Creating the Rectangular Pattern
- Creating the Bend Feature
- Applying a corner round
- Creating Countersink holes
- Creating Hem features
- Mirroring the Features
- Creating the Flat Pattern
- Creating 2D Drawing of the sheet metal part
Chapter 7: Top-Down Assembly and Motion Simulation
- TUTORIAL 1
- Creating a New Assembly File
- Creating a component in the Assembly
- Creating the Second Component of the Assembly
- Creating the third Component of the Assembly
- Adding Bolt Connections to the assembly
- Applying the constraint to the components
- TUTORIAL 2
- Creating the Slider Joint
- Creating the Rotational Joint
- Creating the Rigid Joint
- Driving the joints
Chapter 8: Dimensions and Annotations
- TUTORIAL 1
- Creating Centerlines and Centered Patterns
- Editing the Hatch Pattern
- Applying Dimensions
- Placing the Datum Feature
- Placing the Feature Control Frame
- Placing the Surface Texture Symbols
- Modifying the Title Block Information
- Additional Exercises
- Exercise 1
- Exercise 2
- Exercise 3
- Exercise 4
- Exercise 5
- Exercise 6
آموزش اینونتور، کتاب آموزش جامع (مدلسازی، مونتاژ، ورقکاری، نقشه کشی، شبیه سازی) نرم افزار Autodesk Inventor
آموزش اینونتور، کتاب آموزش مقدماتی تا پیشرفته نرم افزار Autodesk Inventor
کتاب آموزش مقدماتی تا پیشرفته (مدلسازی، مونتاژ، ورقکاری، نقشه کشی، آنالیزو شبیه سازی، جوشکاری و طراحی قالب) نرم افزار Autodesk Inventor، یک کتاب آموزشی جامع و کم نظیر از آموزش نرم افزار اینونتور می باشد. الگوی آموزشی این کتاب مبتنی بر آموزش با مثال می باشد. همانطور که در فهرست مطالب کتاب که در قسمت پایین درج شده است، در این کتاب آموزشی، کاربر اینونتور با کلیه دستورات و همچنین نحوه طراحی و مدلسازی قطعات، مونتاژ مجموعه ها، طراحی ورقکاری، ایجاد نقشه های اجرایی و صنعتی، آنالیز و تجزیه و تحلیل قطعات، جوشکاری سازه ها و همچنین طراحی قالب در محیط اینونتور Autodesk Inventor آشنا می شود.
در ابتدای هر فصل دستورات مربوط به آن محیط توضیح داده شده است و در ادامه چندین تمرین کاربردی، به صورت گام به گام به کاربر آموزش داده می شود تا بر دستوراتی که در آن محیط فراگرفته اشراف کامل پیدا نماید. همچنین در انتهای هر فصل جهت تسلط بر موضوعاتی که کاربر فراگرفته، چندین تمرین در نظر گرفته شده است. این کتاب مشتمل بر 1196 صفحه، در 19 فصل، به زبان انگلیسی روان و به همراه تصاویر هر محیط و نوار ابزارها، به ترتیب زیر گردآوری شده است:
Chapter 1: Introduction
Chapter 2: Drawing Sketches for Solid Models
Chapter 3: Adding Constraints and Dimensions to Sketches
Chapter 4: Editing, Extruding, and Revolving the Sketches
Chapter 5: Other Sketching and Modeling Options
Chapter 6: Advanced Modeling Tools-I
Chapter 7: Editing Features and Adding Automatic Dimensions to Sketches
Chapter 8: Advanced Modeling Tools-II
Chapter 9: Assembly Modeling-I
Chapter 10: Assembly Modeling-II
Chapter 11: Working with Drawing Views-I
Chapter 12: Working with Drawing Views-II
Chapter 13: Presentation Module
Chapter 14: Working with Special Design Tools
Chapter 15: Working with Sheet Metal Components
Chapter 16: Introduction to Weldments
Chapter 17: Miscellaneous Tools
Chapter 18: Introduction to Stress Analysis
Chapter 19: Introduction to Plastic Mold Design
آموزش اینونتور، کتاب آموزش مقدماتی تا پیشرفته نرم افزار Autodesk Inventor